TL;DR: To display an estimated read time for your WordPress posts directly in Elementor without using extra plugins, you can utilize a custom PHP function and Elementor’s dynamic tags feature. By adding a snippet of code using the Code Snippets plugin, you can create a custom active tag in Elementor Pro that calculates and shows the read time for each post, enhancing user engagement and providing valuable insights to your readers.
When enhancing user experience on a website, providing readers with an estimated read time for your articles can be incredibly beneficial.
It sets expectations for the time investment required and can encourage visitors to commit to reading.
If you’re using Elementor Pro, you don’t need an additional plugin to add this feature to your posts. With a simple custom function and the power of Elementor’s dynamic tags, you can easily display the estimated reading time on your WordPress site.
Let’s walk through the steps to implement this functionality without cluttering your WordPress installation with more plugins.
The Post-Read Time Function Overview
The custom function estimate_reading_time() calculates the estimated time for a person to read a WordPress post. It does so by counting the words in the post and dividing it by a standard reading speed (words per minute). You can adjust this if you want.
The function can dynamically display the reading time on posts when using Elementor Pro by creating a custom dynamic tag.
// Include the necessary WordPress admin file for is_plugin_active() function
include_once( ABSPATH . 'wp-admin/includes/plugin.php' );

if ( is_plugin_active( 'elementor-pro/elementor-pro.php' ) ) {
    // Elementor Pro is active, so register your dynamic tag action
    add_action('elementor/dynamic_tags/register_tags', function( $dynamic_tags ) {
        // Include the Tag class file
        include_once 'path_to_your_reading_time_tag_class.php';

        // Finally register the tag
        $dynamic_tags->register_tag( 'Reading_Time_Tag' );
    });

    class Reading_Time_Tag extends \Elementor\Core\DynamicTags\Tag {

        public function get_name() {
            return 'reading-time';
        }

        public function get_title() {
            return __('Reading Time', 'text-domain');
        }

        public function get_group() {
            return 'post';
        }

        public function get_categories() {
            return [ \Elementor\Modules\DynamicTags\Module::TEXT_CATEGORY ];
        }

        protected function register_controls() {
            // Add any necessary controls for your dynamic tag here
        }

        public function render() {
            $post_id = get_the_ID();
            $content = get_post_field('post_content', $post_id);
            echo estimate_reading_time($content);
        }
    }
}

// Estimate_reading_time() function
function estimate_reading_time($content) {
    $word_count = str_word_count(strip_tags($content));
    $words_per_minute = 200; // Average reading speed (words per minute)
    $reading_time = ceil($word_count / $words_per_minute);
    return $reading_time . ' minute' . ($reading_time === 1 ? '' : 's') . ' read';
}
How to Use with Code Snippets Plugin
The Code Snippets plugin for WordPress allows you to add PHP code snippets to your site without directly editing your theme’s functions.php file. We highly recommend it. Here’s how to use the function within the Code Snippets plugin:
Install and Activate the Code Snippets Plugin:
In your WordPress dashboard, navigate to ‘Plugins’ > ‘Add New’. Search for ‘Code Snippets’, install and then activate the plugin.
Create a New Snippet:
Once the plugin is activated, go to ‘Snippets’ > ‘Add New’ in your WordPress dashboard to add a new snippet.
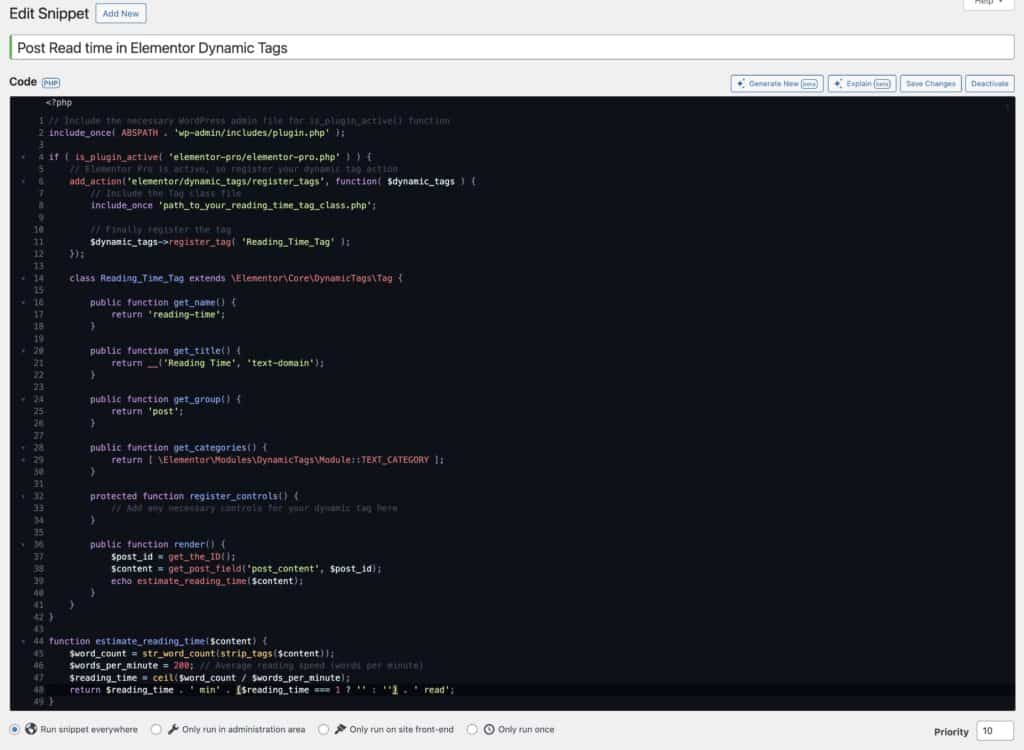
Add the Custom Function and Elementor Hook:
Copy the PHP code for the custom function and Elementor dynamic tag (included in the previous responses) into the code area of the new snippet.
Make sure that:
- You include the check for Elementor Pro activation.
- Snippet is set to run everywhere.
Activate the Snippet:
Once you’ve added the code, click ‘Save Changes and Activate’ to activate the snippet. The function will now be active on your site.
Use the Custom Tag in Elementor:
With Elementor Pro active, and the Code Snippets snippet activated, you can now use the custom dynamic tag within Elementor to display the estimated reading time.
Edit a page with Elementor, and where you want to display the reading time, use dynamic tags to select the custom tag named “Reading Time.” It will automatically display the estimated reading time for the post.

Conclusion
By integrating a custom function with the Code Snippets plugin, you can enhance the functionality of your WordPress site and Elementor Pro without modifying core theme files. This approach streamlines the process and provides a more secure and update-proof method of adding custom PHP code to your website.
Always test your snippets on a staging environment before applying them to your live site to prevent potential issues.