
Ever wondered – what needs consideration after you’ve installed WordPress?
After installing WordPress Core on your website, let’s learn how to set WordPress measures correctly.
You don’t need to go through experts’ opinions throughout the process. Setting up WordPress basic measures involves point-and-click routines – it doesn’t require complex infrastructure.
Set WordPress Basic Settings after WordPress Installation
Role of WordPress Support Services
For non-Techies, WordPress Support Services help you maintain your site with monthly plans or one-time support.
In this regard, don’t forget to check our services for WordPress users – from beginners to established corporate websites.
Let’s address WordPress’ basic settings to consider after you’ve installed WordPress.
Screen Options and Widgets
The WordPress Home Feed displays widgets for plugins, themes, and 3rd party scripts installed in WordPress, making the dashboard slower.
Once logged into the WordPress dashboard, you should see the screen options at the top of the page, helping you hide or show widgets.

Ensure you’ve hidden unnecessary widgets for improved page speed in WordPress.
Default Posts
WordPress is packed with default posts, pages, and assets. After you’ve installed WordPress, removing default assets from WordPress is undeniable – such is the case with posts, as shown in the screenshot below.
Head over to the All Posts page and remove the default content. You should also remove Trashed posts from the dashboard.
Categories and Tags
WordPress categories and Tags help users better organize WordPress content. Once you’ve finished installing WordPress, you should set the default category for content.
Head over to Posts -> Categories and rename the default category of WordPress. In most cases, WordPress users prefer renaming the default category to Blog.
Default Pages
Like posts, WordPress includes default pages, as shown in the screenshot below.

Next – head over to Pages and remove the default content from WordPress better, if you could rename and edit the default pages for important content, such as About us, Contacts, or Privacy Policy.
Manage Themes
Next – let’s learn how to manage WordPress themes after you’ve logged into the WordPress dashboard for the first time.
On the Appearance -> Themes page in the dashboard, you can upload, remove, or manage WordPress themes with point-and-click options, as shown in the screenshot below.
As WordPress core comes packed with default themes, you can also kill and upload a new theme. Once completed, you’re ready to start creating niche content.
Widgets
On the Appearance -> Widgets page in the dashboard, WordPress helps you manage widgets That affect your site’s front end, as shown in the screenshot below.
Here – choose widgets one by one and click Remove. After removing unnecessary widgets, you can check your site’s front-end – home page to see if the change has made any difference.
Create a Primary Menu
WordPress can’t create navigation bars if you’ve not made a primary menu. A menu lists your site’s pages and helps users generate site links, footer lists, and navigation bars.
In the WordPress dashboard, the Appearance -> Menus page helps users create menus, as shown in the screenshot below.
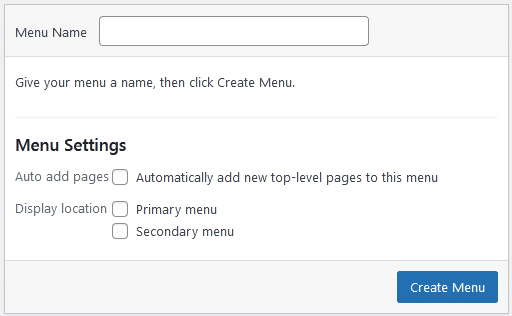
To get started – enter a name for a new menu, choose its type, and add pages – don’t forget to save changes at the end.
Manage Plugins
In WordPress core, developers have packed default plugins – Akismet for spam comments and Hello Dolly for entertainment purposes.

We recommend that you remove ‘Hello Dolly’. Akismet is something you should keep. Ensure that you set up an API key for Akismet to work correctly, you can do this for free. Akismet is one of the best spam protection plugins for user registration and forms on your site. Trust me, you will be happy you enable this early on.
User Accounts
During WordPress installation, you can create a dashboard login – username and password.
On the Users page in the dashboard, you can leave measures if the user’s information is satisfactory – or – proceed to create a new user instead.

Moreover, you can change the user’s information, such as password, avatar, and email address.
Site Health
The Tools -> Site Health page in the dashboard lists measures about your site’s health. Here – you can see if a specific part of your site needs attention, such as updating the PHP version.
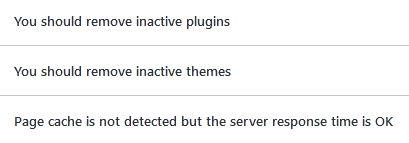
Make sure – you’ve followed the suggestions given on the Site Health page. If, for example – you don’t understand a specific direction, don’t proceed to change WordPress options.
General Settings
WordPress general settings include changing the site title, description, and user’s avatar.
Once you’ve installed WordPress, you can land on Settings -> General page to manage basic information, as you can see in the screenshot below.
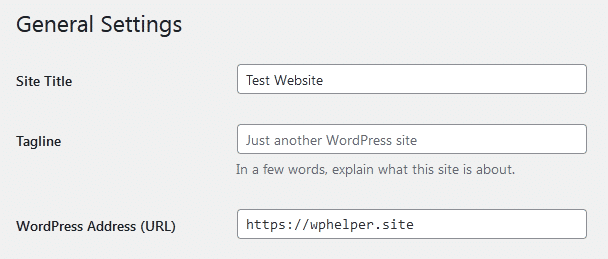
Here – don’t bother changing WordPress and Site addresses unless you want to install WordPress to a different location on the server.
Discussion Settings
On the Discussion page, you can keep new comments on hold after a user leaves a discussion thread on posts.
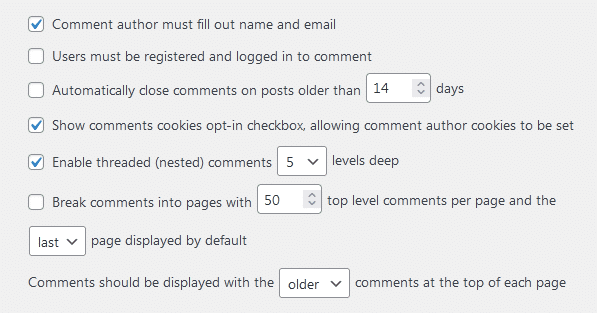
On this page, you can also change your avatar for new comments and other settings to quickly manage WordPress comments.
Permalinks
In simple words, Permalinks refer to links created for WordPress pages and posts.
In WordPress, once you’ve finished installing the Core package, you should change the WordPress permalink structure on Settings -> Permalinks page.

Changing the permalink structure too often is not recommended. Once you’ve set a structure, don’t change it.
Legal Pages
Creating legal pages is mandatory if you’re selling products on your website. In some countries, legal pages have more importance for online stores.
WordPress provides default templates for legal pages, such as privacy policies. You can edit the template to suit your store, blog, or business website. However, if you know how to create, edit, and manage pages in WordPress, you can make and publish legal pages from scratch in WordPress.
Here are the default templates for legal pages in WordPress.
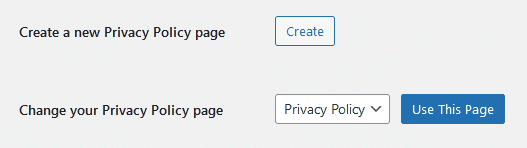
You can also create legal pages from scratch, as described above. In this case – the Settings -> Policy page in the WordPress dashboard helps you get started.
Additional Factors
Let’s address additional measures for WordPress users – helping you connect your new site with apps.
Robots.TXT File
A robots.txt file contains directives for search engines. Web admins, such as content publishers – use robots.txt files to tell Google if certain pages are allowed for indexing, denial, or blocking from search pages.
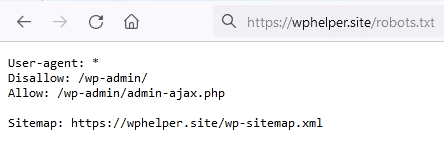
You don’t need to alter the file’s content as a beginner. However – if you know what you’re doing, you can address indexing in Google – by changing directives in the Robots.TXT file.
Check SSL and Redirects
Once you’ve registered a new Domain with Hosting, companies automatically install SSL for users, such as Namecheap.
However – in some cases, you will need to check and verify if your site’s SSL has been installed correctly.
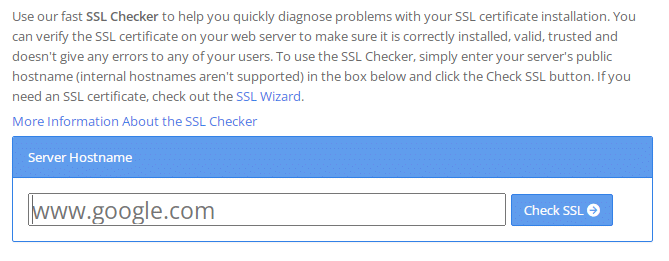
Here – you need to use SSL checkers for SSL verification. Head over to SSL Checker, enter your site’s address, and check your site’s SSL for errors.
In the same manner – you need to check your site’s redirects. Here is the tool – to help you check your site’s URL versions for redirects.
Configure Two Factor Authentication (2FA)
Two Factor Authentication (2FA) helps you tighten your site’s login system. When enabled, users need different codes to log in after they have entered valid credentials.
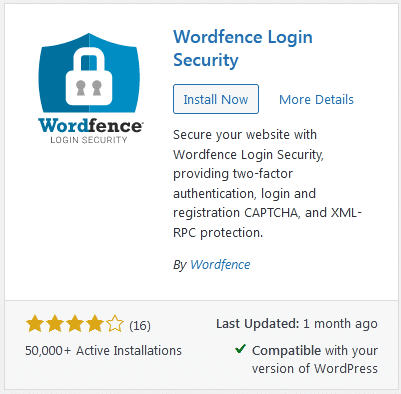
In WordPress, plugins like WordFence help you set 2FA system on your website. Once installed – you can configure 2FA on WordFence -> Login Security page.
Google Analytics and Search Console
Google Analytics and Search Console are Google’s free tools for content publishers – helping them see their blog’s traffic stats and improve search rankings – respectively.
Once creating content, you’ll need to complete and connect Google’s profiles. Here is the detailed tutorial for how to make and connect both accounts.
Hide WordPress Login Page
Hiding WordPress login helps users prevent their sites from brute force attacks – targeting login pages by trying password combinations for successful logins.
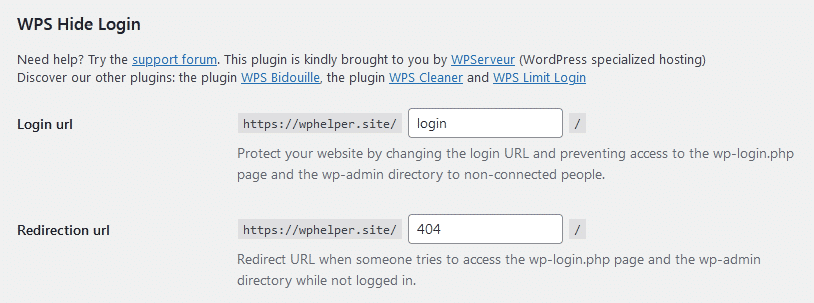
In this case, the WPS Hide Login plugin helps WordPress users hide their sites’ login pages. Once installed the plugin, the dashboard’s options help you rename your login page in WordPress.
Conclusion
In this article – you’ve learned how to set WordPress basic settings after you’ve finished installing WordPress. For more information on keeping WordPress maintained, visit this detailed tutorial.
In most cases, you can perform basic settings right after logging into the WordPress dashboard – for the first time.
The entire process helps you clear the ground for the next steps – including plugin installation, content creation, and performing WordPress management routines.
For more information on WordPress basic settings, maintenance routines, or hiring support services for WordPress, let us know your thoughts on custom plans and support services.


